Teaching and learning experiences that take place outside of the confines of the classroom walls have a range of benefits for both students and teachers. When students are asked to put into practice “in the real world” what they have theorized about from behind a desk, the result is a student-centric learning experience that enhances learning and fosters personal and social development (Larsen, Walsh, Almond, & Myers, 2017).
Authentic tasks or lesson plans created by project members, teachers practitioners for the students to learn outside the classroom:
1, Lithuania Lekečiai school:
lithuania - 1 task - lithuanian.docx
lithuania - 1 task - english.docx
Mathematics and tourism
The lesson took place in the woods, 6 kilometres from the school. All the way, the students went for a walk, watched nature and visited a natural monument - the pine of Silagiris. Performed measurements of pine height, trunk thickness. Used proportional triangles and proportions. The volume of wood and the volume of roots were calculated from the given tables as well. The tree age determination formulas gave very different results that did not appear to be reliable. The students then spoke to the forest workers, who assured them that the pine could be over 200 years old. This autumn lesson - the trip is becoming traditional and for three years we have been going to measure the same pine. This year, we found that the volume of the pine trunk thickened by 2 centimetres.
The students used pedometers and received about 18,000 steps. They walked about 12 kilometres.
2. Ford Otosan Ortaokulu school Turkey:
Schools are closed due to the pandemic. In addition, young people and children under the age of 20 are only allowed to go out at certain hours (4 hours). Therefore, our school's math teacher Ali AYGÜN conducted the lessons with his students using a zoom program.
'Mathematics in Nature' lesson presentation and plan.pptx
math in nature PDF.pdf
MATHEMATICS IS THE LANGUAGE OF NATURE.

,


3. Özel Osmaniye Eğitim Kurumları A.Ş. Private Osmaniye İstek Secondary School
The math teacher gives a lesson about fractals The video is about fractals which mean a curve or geometrical figure, each part of which has the same statistical character as the whole. They are useful in modelling structures (such as snowflakes) in which similar patterns recur at progressively smaller scales, and in describing partly random or chaotic phenomena such as crystal growth and galaxy formation. We examined the fern, which is one of the most important examples in nature.
4. Scuola media "T. Tasso", Italy
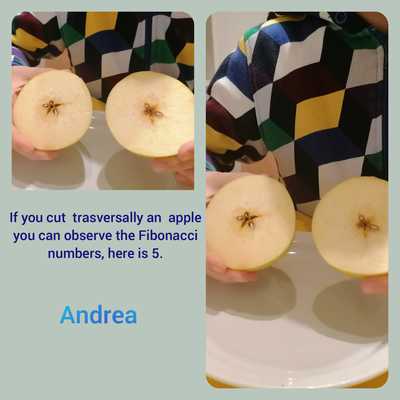
November 23 is FIBONACCI DAY !!!
We Italians are very attached to the figure of Fibonacci, whom I try to make known to the students as soon as possible. It is one of those topics that start from history and goes ... to wonder! Discovering mathematics so linked to so many completely unexpected aspects of the world is certainly fascinating and develops curiosity and passion! This year I wanted to remember this day with them because I had already introduced the Fibonacci figure a few months ago, through this activity that started very simply from the numbers of its succession, which we generated together. We started from the history of figures: from India to the Arab people ... and finally, thanks to Fibonacci, these figures were able to be known and used in Europe too.
So they immediately understood that to find out what was the reason for the recurrence they had to observe the date of the day carefully.
11/23 ... well, nothing special!
I suggested they use the "Anglo-Saxon format" of the date which, as we had seen together, required them to reverse the month and day numbers.
So: 11/23 ... 1 1 2 3 ... ah yes !!! It's those numbers! Those of the succession where it was always necessary to add the previous two !!! The succession of Leonardo Fibonacci !!! Bonacci's son !!! What had the rabbit farm !!!
The pupils immediately recalled the experience they had a few weeks earlier and this succession that continued indefinitely and whose numbers were always becoming enormously larger ...
They also immediately recognized my T-shirt which represented rabbit families!
So we reviewed the notebook page on which we had written the numbers of the succession and we reread them.
I explained that starting from the numbers of the sequence, we would build a geometric design ... WONDERFUL! Which would remind us of so many things we had already seen!
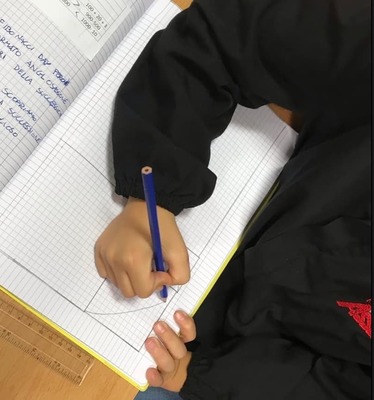
I had previously prepared their notebooks by making a square with the pencil with the side of 1 square (5 mm) at a precise point of the page.
It was the point of reference from which to start all the geometric design.
placing the notebook sheet horizontally and considering the margin as a limit, they marked the small square at the intersection of the tenth row and the sixteenth column, starting from the lower-left corner.
The boys noticed the square. They positioned the page horizontally and followed my directions step by step to make this design.
First, we referred to the numerical sequence. the first number of the Fibonacci sequence is 1. The first ready-made square had in fact the side of 1 square.
So I asked the children: what is the next number? 1!
So I explained to them that we should have made another square with the side of 1 square (therefore the same as the previous one)We, therefore, built the new square exactly UNDER the previous one, so that it had one side in common.
The next number in the sequence is 2, so we would then have to construct a square with a side of 2 squares.
The children noticed that the two squares are already drawn already formed a side of 2 ready-made squares.
So I gave the indication to place the square with 2 squares on the LEFT side of the two squares so that it had its side in common with them.
The next number was 3: we then built a square of side 3 ABOVE the other squares, where there was already a side of 3 squares ready.
Then there was 5: we built a square with side 5 to the RIGHT of the others.
Then 8: the square with side 8 was positioned UNDER (we came to touch the edge).
Then 13: the new square had to be on the LEFT (also in this case it touched the left margin for us).
Then 21: we built the new square ABOVE the previous ones (also touching the top margin).
Finally (for us, but the sequence can continue!) We built the square with side 34.
Having the margins, we were unable to keep within the margin, because the squares were not enough. However, some children measured with the ruler and noticed that the 34th square would have ended exactly at the end of the notebook page or shortly before. So many have used the edge of the page as the "final" side.
With a squared A3 sheet (two facing pages) a larger rectangle could have been built. We stopped here.
At this point, I told the guys that the simplest job was done ... the hardest part was missing. !!!
At this point, I asked the children to put a finger on the first square from which we started: the one on side 1, higher up.
I first showed the computer what they should have done: they should have joined the top left corner of the square to the bottom right corner. If they had used a ruler, they would have easily drawn a diagonal. But we needed to build a curved line. So I told them to imagine a circle cut into 4 wedges and to try to build a freehand curve starting from the top left corner up to the opposite one, bottom right.
I showed them how to do it and they managed the turn carefully and easily.
I said to keep the pencil steady on the finish line.
At that point, I explained (showing it on the blackboard) that they should have done the same thing also in the second square with the side of 1 square.
They made this curve too and told me it looked like half a circle!
Then we moved on to the larger square, with 2 squares on each side.
Here, too, they should have continued the curve, but this time they should have enlarged it slightly because the square was bigger.
Without great difficulty, the boys built the piece of the curve that continued.I asked the children to describe the element they had made.
Someone recognized the right word to describe it: SPIRAL.
We tried to describe what a spiral was and where they had seen this type of spiral before. The children's observations were very interesting indeed.
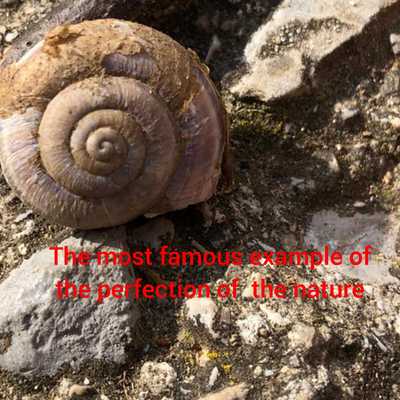
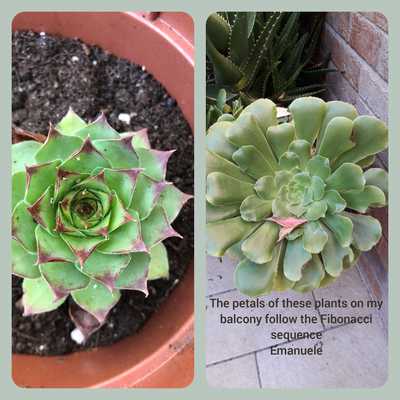
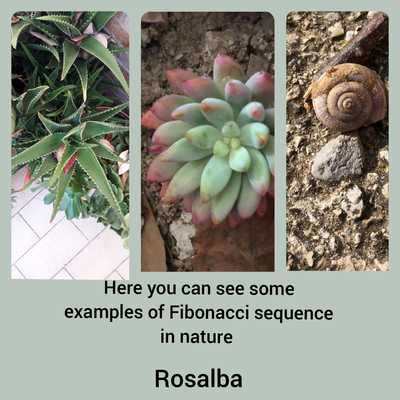
A few "long eyes" immediately noticed that some images of objects containing spirals like that were represented right on our door of the science classroom: there was just a Fibonacci spiral built like ours, but there was also a particular shell and a Roman cabbage in which a spiral structure could be seen. Other children said they saw this spiral in nature:
in snails, in some fossils, in the movement of cyclones, in the waves of the sea, in the body of a coiled snake, in the shape of an elephant's trunk, in the flight of a leaf that detaches from the tree and goes towards the ground, in the of a vortex, in the form of galaxies......
They have identified these aspects alone and without suggestions or images which, however, all have extremely real foundations! Look at these pictures.
 |  |
 |  |
 |  |
 |  |
 |  |
 |  |
 |  |
 |  |
 |  |
 |  |
 |  |
5. Agrupamento de Escolas Pedro Jacques de Magalhaes:
Finding PI number
The goals of the activity were to put students investigating more about the PI number. In the class, we never talk about the subject. Through TEAMS and OneNote, students read a script and explore circular objects and with a string, they measure the perimeter and diameter of the circles.
Students registered data on a table and calculated the ratio between the perimeter and the diameter.
After measuring different objects students realize that the ratio was always 3,1. After this, we talk about the PI number.

6. Zakladna skola Benkova 34:
slovakia_C1_ NATURE_EN.pdf
slovakia_C1_ NATURE_EN.docx
slovakia_C1_NATURE_SK.pdf
slovakia_C1_NATURE_SK.docx
How long is 1 metre? And what objects around us are 1 metre long?
First of all, we explored a metre – each group used 10 cm long paper tissues to cut 1 m long rope (we had to sign each distance of 10 cm).
Then we guessed without measuring – what is longer than 1 m and what is shorter?
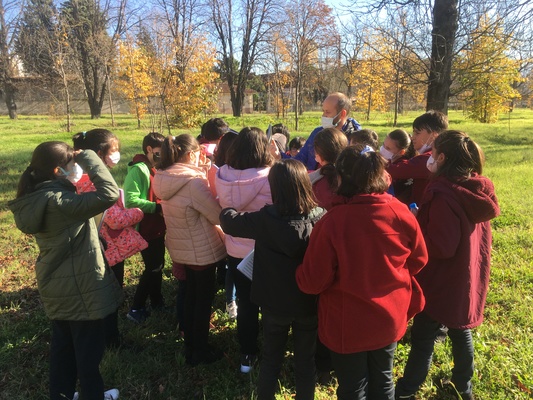
After that we verified our premises by measurement: we measured ourselves, we measured the perimeter of the trees around us and also the circumference of the picnic table, we measured the length of the bench in the park and we measured also the length of the playground (we had to put together different pieces of ropes...)
During the activity everybody found his / her place – everybody felt useful: someone enjoyed cutting the rope and preparing a scale, someone else enjoyed guessing the lengths, the other one measuring and there were also pupils who enjoyed filling in the worksheets J
This is how we spent one of the last days at school in October, we hope to come back there soon!
 |  |
 |  |
 |  |